
A bad light ballast can cause your fluorescent lights to flicker or not work. The solution is to know how to test your ballast so you can make sure your light is working.
The best way to test a ballast in a fluorescent light is to use a multimeter to check the voltage and the continuity across the terminals of the ballast. This will help you figure out if your ballast is okay or if you need to fix it or replace it.
Let’s go through the steps to test a ballast in a fluorescent light to make sure your light works well.
Testing a fluorescent ballast is crucial when your lighting begins to flicker, dim, or fail altogether. The ballast regulates the current to the fluorescent tubes, ensuring they work efficiently. If the ballast malfunctions, the lighting system won’t perform as expected, leading to poor lighting quality and energy inefficiency. By testing the ballast regularly, you can identify issues early and prevent significant damage to the fixture. Diagnosing problems in time allows for either repair or replacement, ensuring that your lighting remains reliable and functional.
Before starting the testing process, you will need a few essential tools. The primary tool is a digital multimeter, which is used to measure electrical current, voltage, and resistance. This tool is indispensable for diagnosing ballast issues. Other necessary tools include an insulated screwdriver to open the fixture, safety gloves and goggles to protect yourself from electrical hazards, and a flashlight to illuminate the workspace if lighting is inadequate. Having these tools ready ensures the process is both safe and efficient.
Now that you have the tools, you can begin testing. The first step is to turn off the power at the breaker to avoid the risk of electric shock. Always double-check that the power is off by using a voltage tester to confirm there is no current flowing through the fixture. Next, remove the fluorescent tubes from the fixture carefully. This allows you to access the ballast without interference and ensures that the tubes are not damaged during the process. After removing the tubes, use your insulated screwdriver to expose the ballast by opening the fixture’s cover. Most fluorescent fixtures have a metal cover that protects the ballast and wiring.
Once the ballast is exposed, it’s time to use your multimeter. First, you should test for continuity. Set your multimeter to the continuity setting and place the probes on the ballast terminals. This will check whether the electrical current is flowing properly through the ballast. If there is no continuity, the ballast is faulty and will need to be replaced. If the multimeter beeps or shows continuity, it means the ballast is still conducting electricity.
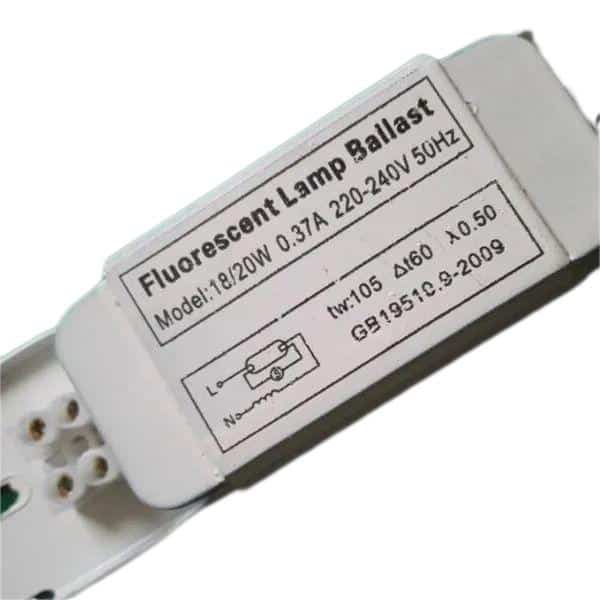
Next, switch the multimeter to the voltage setting. To test the voltage, turn the power back on and measure the voltage between the ballast’s input terminals. Compare the reading with the ballast’s specified voltage, which is usually listed on the ballast label. If the voltage is too high or too low, there is likely a problem with the ballast or the fixture’s wiring. In such cases, the ballast may need to be replaced to restore the proper functioning of the lighting fixture.
There are also several signs that indicate a ballast may need to be replaced, even if you haven’t performed a full test. One of the most common indicators is flickering or dim lighting. This usually means the ballast is no longer supplying a stable current to the tubes. Additionally, a buzzing or humming sound coming from the fixture is often a sign that the ballast is nearing the end of its life, especially in older magnetic ballasts. If you notice a delayed start when turning on the lights or if they don’t light up at all, these are also signals that the ballast is failing.
To prevent any electrical accidents while testing, it is important to take safety precautions. Always ensure that the power is off before you begin handling any parts of the fixture. Wear insulated gloves and safety goggles to protect yourself from electrical shocks or flying debris if something goes wrong during testing. Additionally, work in a well-lit area and keep your workspace free of any water or flammable materials that could pose a risk.
After testing, depending on your results, you will either need to reassemble the fixture or replace the lamp ballast. If the ballast is functioning correctly, carefully reassemble the fixture by replacing the cover and reinstalling the fluorescent tubes. Turn the power back on and ensure the lighting works smoothly without flickering or dimming. If the ballast is faulty, purchase a replacement that matches the specifications of the original ballast. Follow the manufacturer’s installation instructions or hire an electrician to ensure it’s installed correctly. Replacing a faulty ballast will restore the lighting system to optimal performance, preventing further damage and improving energy efficiency.
The best way to test a fluorescent light ballast is to use a multimeter to check the continuity and voltage. This is a simple way to figure out what’s going on and make sure your light is working right. If you check your ballast regularly, you can make it last longer and avoid paying a lot of money to fix or replace it.